Better Together: Dynamics 365 Business Central and Microsoft 365
- Systema Solutions
- Jul 27, 2022
- 2 min read
In order for small to mid-sized businesses to stay competitive, SMBs need to eliminate redundancies, stay efficient, and enable rapid response to changing market demands. However, using apps that don't talk to each other hinder SMBs from staying on top of its game. That's the reason why Microsoft has made its tools, solutions and services natively integrate so you can achieve more from your software investments.
When you have Microsoft 365, you already have access to a wide array of tools - from office productivity, content and collaboration, communication, workflow automation, reporting, to security, and more. All these solutions are designed to integrate and work well with Dynamics 365 products (and Azure). When you integrate Dynamics 365 solution such as Business Central to Microsoft 365, it can help your team to work better together so they can get more work done.
We highlighted some of the reasons we love about the integration between Business Central and some of the apps in Microsoft 365 below, along with the steps on how you can use it too.
Enhancements to Microsoft Teams integration
The Business Central App for Teams now allows its users to access business data directly on Teams!
When you paste a link to Business Central while composing a message, a new banner will appear displaying suggestions or a preview of the link.
To give this a go, go to your Teams app.
Copy + Paste a Business Central related link in a message, channel, or meeting.

Outlook add-in - add email attachments to Business Central records
Our email inboxes are the primary source of different files that are used in creating varying documents in Business Central. The Outlook add-in now allows copying email attachments to the record displayed in the add-in.
Go to Outlook.
Open email with attachments to be used for Business Central.
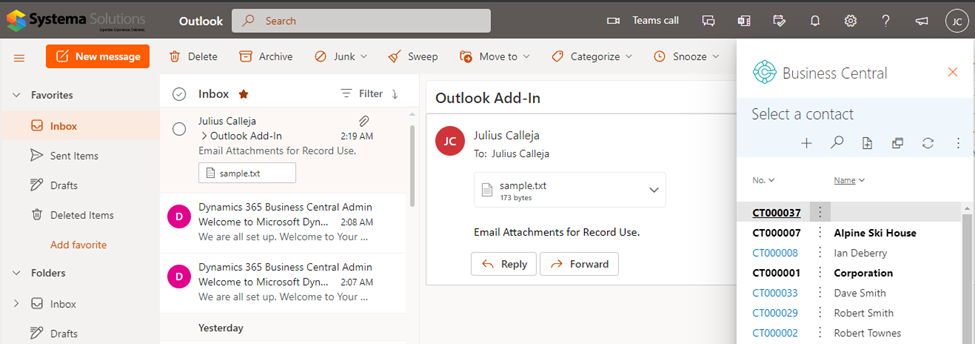
Click More Apps then Business Central and select the document you wish to create.

4. Select a contact for the document.

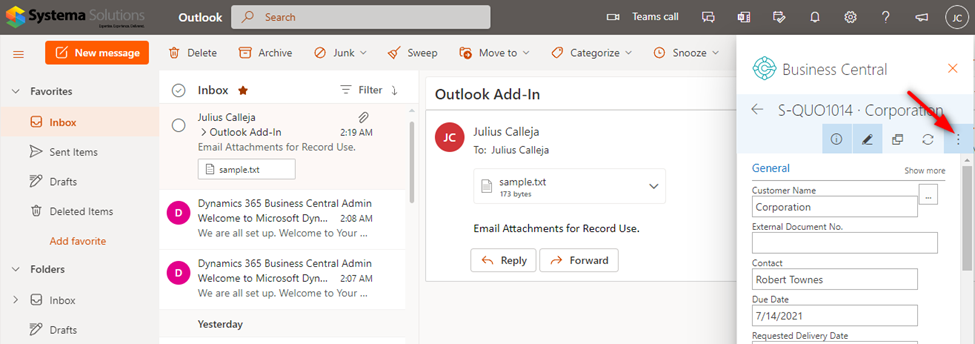
5. After the document is created, click the three dotted lines to show more options and select Attachments then select Attach files.


6. Select “Attach from Email” and hit OK.

7. Select the files that you wish to attach and press the check mark to confirm.


The attachment(s) you selected are now attached to the Business Central document. This makes attaching documents to new records and customers more convenient and user friendly.
Share a file through OneDrive
Did you know that Business Central now allows direct sharing of attached files in documents through Business Central itself? This gives ease-of-access to business users as it allows for file sharing directly and without the need of going to OneDrive.
1. Go to a document in Business Central with attached files.

2. Go to the Attached Documents page by clicking the number beside “Documents”.

3. Select the attachment you want to share through OneDrive and click Share.

4. On the Share window, you can add users who can view or edit the link, set restrictions and passwords, put an expiration date, and limit the users who can access the link.


The customizability of access for the shared link ensures that you can only share it with the people you need to and minimizes the risk of unnecessary access.
Comments